Vinyl Lettering and Art Installation Instructions
BEFORE YOU GET STARTED!
We want you to be happy with your Write My Walls graphic from the moment you put it on, so
please follow these instructions carefully. You are about to put two different adhesive sheets onto
your wall to install your graphic. Be sure that your paint has proper adhesion and will resist
peeling away from the surface of your wall as you remove these two layers. You can test this by
putting painter’s tape on the wall where you intend to apply the graphic and then removing it. On
freshly painted walls, we recommend you wait 30 days before applying your graphic.
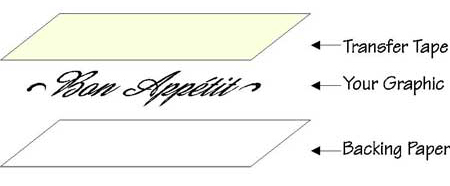
Your wall graphic comes in 3 layers:
The top layer is called transfer tape and was
applied to the face of the graphic in our facility.
This layer will help hold the graphic away from the
wall until it is ready to be applied. The middle layer
is the vinyl graphic. The bottom layer is the
backing paper that protects the adhesive prior to
application |
 |
INCLUDED IN YOUR SHIPMENT:
Ready-to-install wall graphic(s)
One wooden application tool
Installation instructions |
Additional/Optional tools needed for installation:
Blue painter’s tape
Measuring tape
Ruler/straight edge
Pencil
Eraser |
|
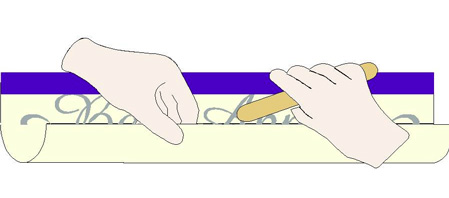
Step 1. Preparing the graphic
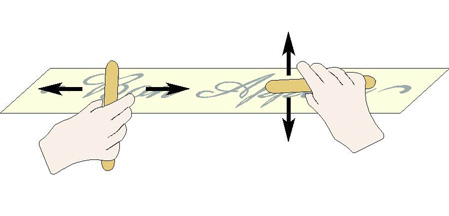
Remove your graphic from the box and lay it face
up (so that the lettering is readable in this
position) on a clean, dry, flat surface. Using the
wooden application tool, rub the graphic as
illustrated in the figure at right, working
from the middle to the outside edge. This will
remove any wrinkles and ensure that the graphic is
securely attached to the transfer tape. |
 |
Step 2. Preparing the wall surface
Prepare your wall for installation ensuring that it is free of dirt, wax, oils and moisture. Make sure walls are completely dry before applying your graphic. |
Step 3. Placing the graphic
Your eye will judge your graphic as being level by comparing it to the closest parallel line. This could be the
top of a door jam or tabletop or perhaps the line where the wall meets the ceiling. Therefore, you should
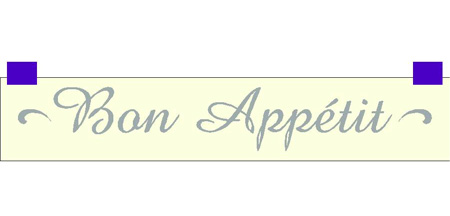
measure each end of the graphic to that parallel line so that it will be level to the eye. Center the graphic
horizontally by making sure that each end is an equal distance from the ends of the space where it is to be
placed. Then re-check to make sure the your graphic is still parallel to the closest parallel line mentioned
above. See the figure at right. It illustrates putting a small piece of tape at each end of the graphic so that
each is held in place as you adjust the other end. |
 |
Step 4. Hinging the graphic
Once the graphic is level, run a continuous line of painter’s tape across the top of the graphic to secure it to
the wall. See the figure at right. This tape forms a ‘hinge’ that secures your graphic in place while
allowing you to lift it away from the wall in order to remove the backing paper. |
 |
Step 5. Removing the backing paper
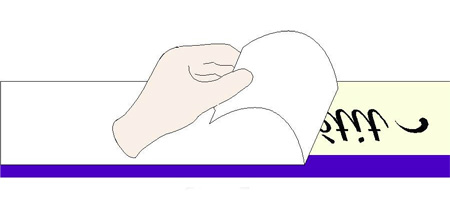
See the figure at right. Lift the graphic up so that the backside of the
backing paper is facing outward. Hold the graphic in this position, and
carefully remove the backing paper leaving only the graphic and the transfer
tape. On larger graphics it will be made easier by only lifting the backing
paper half way and folding it in the middle. This helps to hold the graphic
uniformly away from the wall as the top part is laid to the wall. Then the
balance of the backing paper can be removed a little at a time as the balance of the graphic is applied. |
 |
Step 6. Applying the graphic
Hinge the graphic back down, holding it away from the wall so as not to allow contact with the wall. Using the
wooden application tool, press the lettering on to the wall, smoothing the surface from top to bottom. See the
figure at right. Use the wooden application tool to smooth the entire surface – again working from the
middle to the outside edges. |
 |
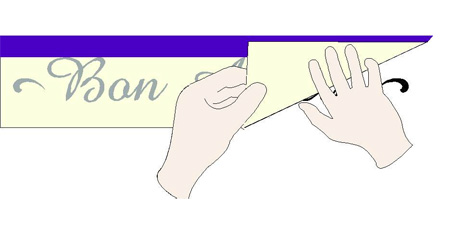
Step 7. Removing the transfer tape
To reveal the finished graphic, work slowly from one of the corners and carefully peel back the transfer tape at
an acute angle. See the figure at right. Do not pull the transfer tape straight out, as this could pull the
lettering off at the same time. |
 |
| Step 8. Enjoy your new wall art! |
 |